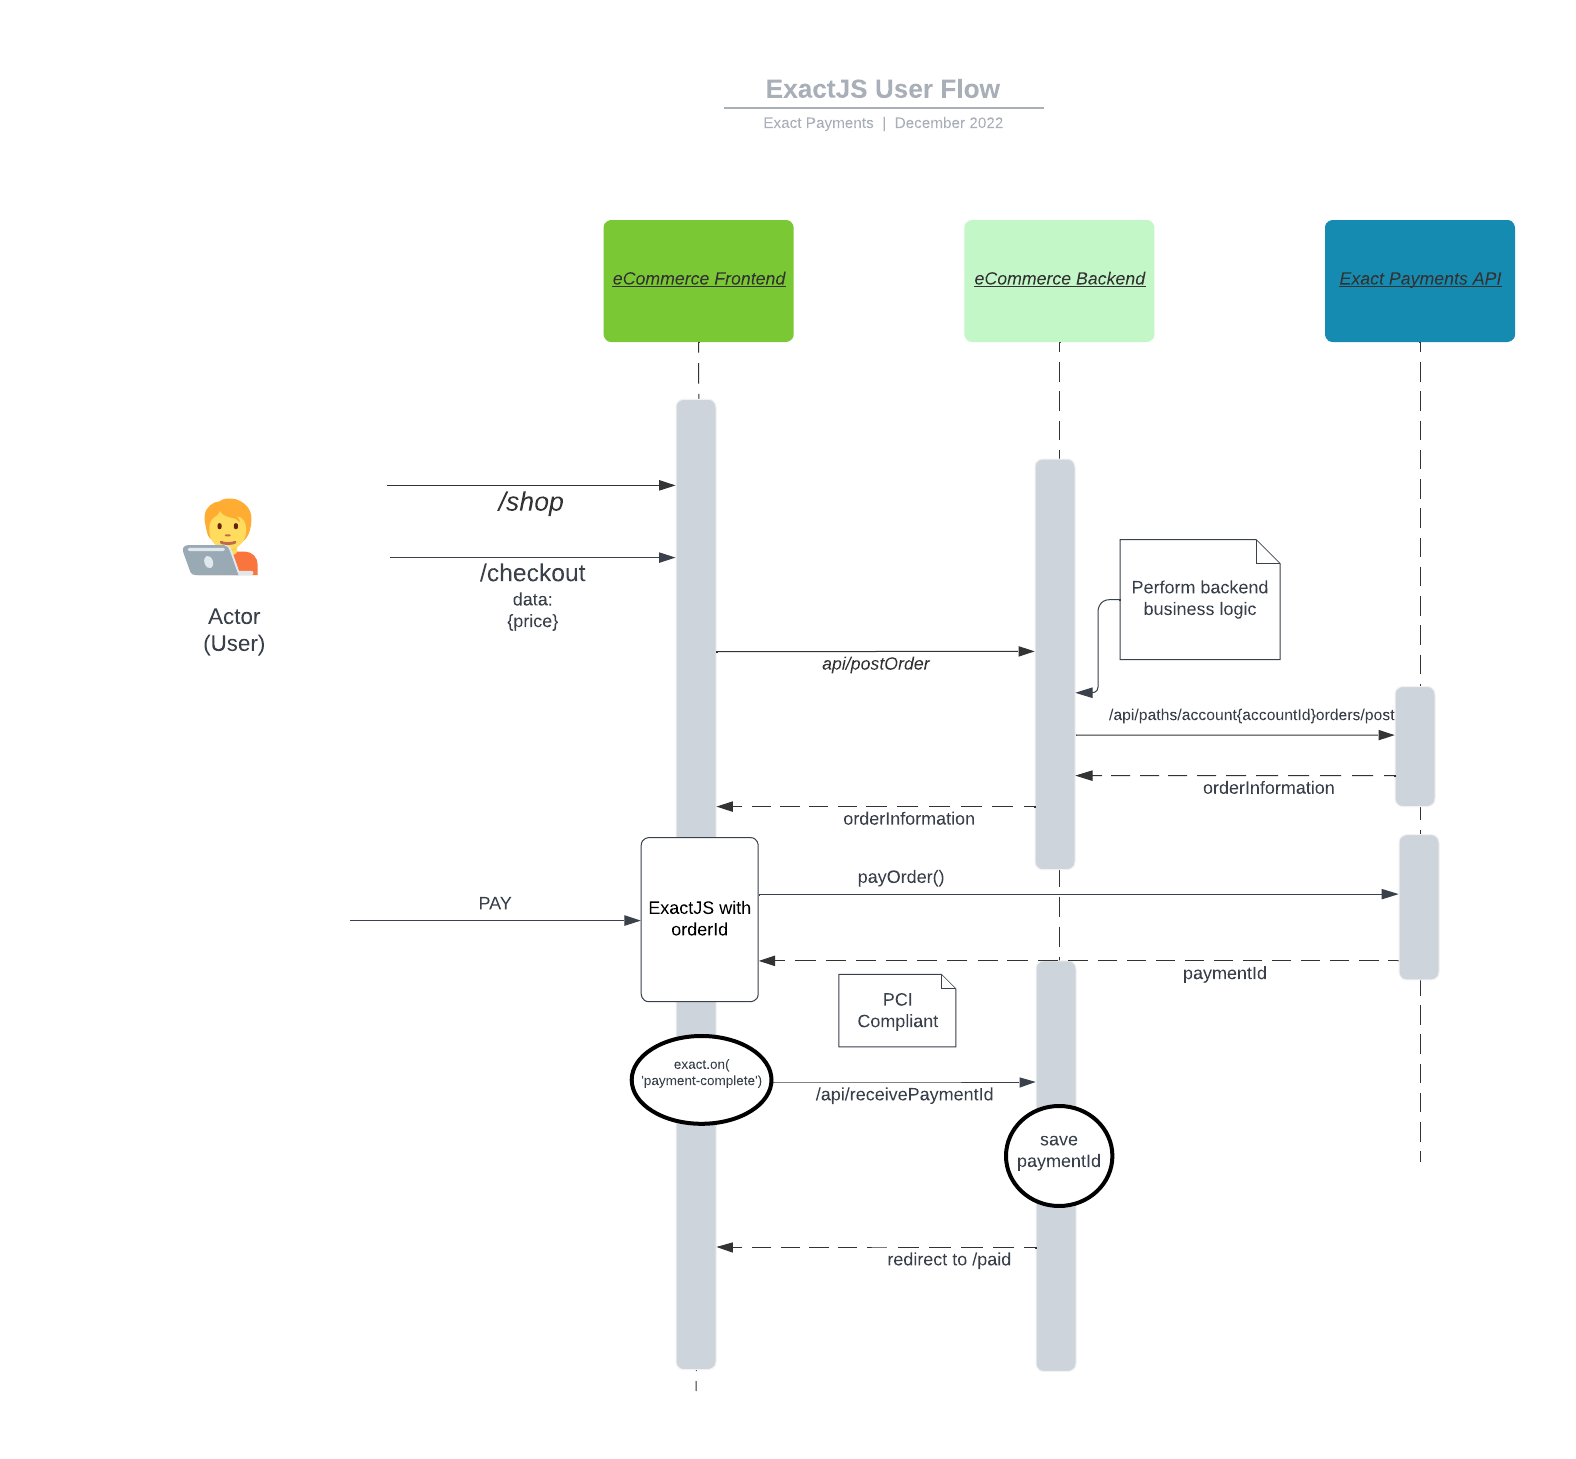
Overview
Exact JS is a web-based hosted payment acceptance solution that simplifies the acceptance of online payments. It protects the merchant or partner from storing, processing, or transporting sensitive credit card data within their environment, effectively reducing merchants' PCI scope. The merchant’s software will make a call to the ExactPay platform with order details and then make a request for the ExactPay platform to present the various fields needed to collect payment, such as the credit card number, cardholder name , expiration date, and CVV code fields. All of the credit and debit card payment methods are supported with this solution including Apple Pay & Google Pay. These fields are presented on the merchant website where they control the layout, labeling, and styling of the fields while only the data being entered in the fields is hosted by Exact Payments.
Prerequisites
The following prerequisites are required to use ExactJS:
- You have been onboarded and given an account ID
- You have generated or been given access to an Application Token
- You will need a list of test cards
Creating an Order
Before rendering your payment form for the customer, you need to send the details of the order to our servers. From your server, send a POST request to our Orders with the details of your customer's order.
You will need to use your API key to authenticate this request. Include it as an Authorization header.
POST /orders
{
  amount: 1123
}
The above example is the bare minimum required to create an order. Please see the Orders API reference for the various other options available when creating an Order.
This will return an order ID and an access token which you will need to include on your payment form.
You can also use the ID with the Orders API to update the order as many times as you need until the customer has paid. Once the order has been paid, further updates will be rejected.
Access Tokens
The access token you received when you created the Order will allow your customers to access our APIs from their browser for a limited time period. It is valid for 15 minutes and, once it has expired, further API requests will be rejected.
You can optionally re-generate an access token if you want to allow your customer more time to complete their payment.
Building Your Form
When building your payment form, you first need to add our ExactJS library.
For the sandbox environment, you should load the file from the api.exactpaysandbox.com domain.
For production, load it from the api.exactpay.com domain.
<head>
  <script src="https://api.exactpaysandbox.com/js/v1/exact.js"></script>
</head>
You then need to initialize the library with the access token - do not use your secret API key!!
const exact = ExactJS("the_access_token");
Create your payment form, including an element to which we will attach our credit card UI. Here's a simple example:
<form id="myForm" action="your_form_url" method="post">
  <div>
    <label for="email-address">Email address</label>
    <input type="email" id="email-address" name="email-address" autocomplete="email">
  </div>

  <div id="cardElement">
    <!-- our credit card UI component will be attached here -->
  </div>

  <div>
    <label for="address">Address</label>
    <input type="text" id="address" name="address" autocomplete="street-address">
  </div>

  <div>
    <label for="apartment">Apartment, suite, etc.</label>
    <input type="text" id="apartment" name="apartment">
  </div>

  <div>
    <label for="city">City</label>
    <input type="text" id="city" name="city">
  </div>

  <div>
    <label for="province">Province</label>
    <input type="text" id="province" name="province">
  </div>

  <div>
    <label for="postal-code">Postal code</label>
    <input type="text" id="postal-code" name="postal-code" autocomplete="postal-code">
  </div>

  <!-- INSERT RESPONSE ITEMS HERE -->

  <div>
    <input type="submit" name="commit" value="Pay Now" data-disable-with="Pay Now">
  </div>
</form>
Tell ExactJS to add the credit card UI to your form. You will also need to provide your Order ID at this stage.
const components = exact.components({orderId: "the_order_id"});
components.addCard('cardElement');
Pay from Browser
Tokenize in Browser
User Flow Diagram
